1.编写m文件“test.m”
function [a,b]=test(x,y)
a=x+y;
b=x.*y;
subplot(1,2,1);plot(x,a); xlabel('X');ylabel('X+Y');
subplot(1,2,2);plot(x,b); xlabel('X');ylabel('X.*Y');
2.配置MATLAB编译器,并使用带”-v”选项的mcc命令编译m文件”test.m”
•用”mbuild -setup”将MATLAB编译器设置为VisualC++6.0
>> mbuild -setup
Please choose your compiler for building standalone MATLAB applications:
Would you like mbuild to locate installed compilers [y]/n? y
Select a compiler:
[1] Lcc C version 2.4 in C:\MATLAB7\sys\lcc
[2] Microsoft VisualC/C++ version 6.0 in C:\Microsoft VisualStudio
[0] None
Compiler: 2
Please verify your choices:
Compiler: Microsoft VisualC/C++ 6.0
Location: C:\Microsoft VisualStudio
Are these correct?([y]/n): y
Warning: Mbuild requires that the Microsoft VisualC++ 6.0
directories "VC98" and "Common" be located within the same parent directory.
(Expected to find a directory named "Common" in the directory 'C:\Microsoft VisualStudio'.)
Try to update options file: C:\Documents and Settings\Administrator\Application Data\MAThWorks\MATLAB\R14\compopts.bat
From template:              C:\MATLAB7\BIN\WIN32\mbuildopts\msvc60compp.bat
Done . . .
--> "C:\MATLAB7\bin\win32\mwregsvr C:\MATLAB7\bin\win32\mwcomutil.dll"
DllRegisterServer in C:\MATLAB7\bin\win32\mwcomutil.dll succeeded
--> "C:\MATLAB7\bin\win32\mwregsvr C:\MATLAB7\bin\win32\mwcommgr.dll"
DllRegisterServer in C:\MATLAB7\bin\win32\mwcommgr.dll succeeded
至此,完成MATLAB编译器设置。
以带”-v”选项的mcc命令编译m文件”test.m”:
>> mcc -B csharedlib:libtest test.m -v其中,操作参数 -B csharedlib 是一个绑定的操作,其等效指令为 -W lib:<libname> -T link:lib。-v选项是显示编译信息。在众多的编译信息中,可确定VisualC++包含文件路径(include directories)和链接库路径(linker library directories)配置。
包含文件路径(include directories)
包含文件路径是以“C1”开头且提示符为"-I"的路径,本例中以"C1"开头有两行,且提示符为"-I"的路径均一致:
-IC:\MATLAB7\extern\include -IC:\MATLAB7\simulink\include -O2 -DNDEBUG
-IC:\MATLAB7\extern\include -IC:\MATLAB7\simulink\include -O2 -DNDEBUG
其中:-IC:\MATLAB7\simulink\include -O2 –DNDEBUG为DNDEBUG路径,不需在VC工程中添加,故VC中需添加的包含文件路径(include directories)为:
C:\MATLAB7\extern\include
链接库路径(linker library directories)
链接库路径是以"link"且提示符为"/LIBPATH:"的路径,本例中为/LIBPATH:"C:\MATLAB7\extern\lib\win32\microsoft\msvc60",故VC工程中需添加的链接库路径为:
C:\MATLAB7\extern\lib\win32\microsoft\msvc60
MATLAB组件运行时(MCR)
MATLAB组件运行时(MCR)是以"link"且提示符为"/nologo"的文件,本例中为:mclmcrrt.lib和libtest.lib。
3.创建Visaul C++工程mcc2
运行VisualC++并单击File->New,打开Project对话框来创建各种VC工程,选取MFC Appwizard(exe)(图2-1,其它程序基本相同)。在loctation编辑框中输入欲创建工程的保存路径,在Project name编辑框中输入工程名如“mcc2”,单击OK进入下一步工程设置对话框,选中Dailog Based,单击Finish完成mcc2工程创建。
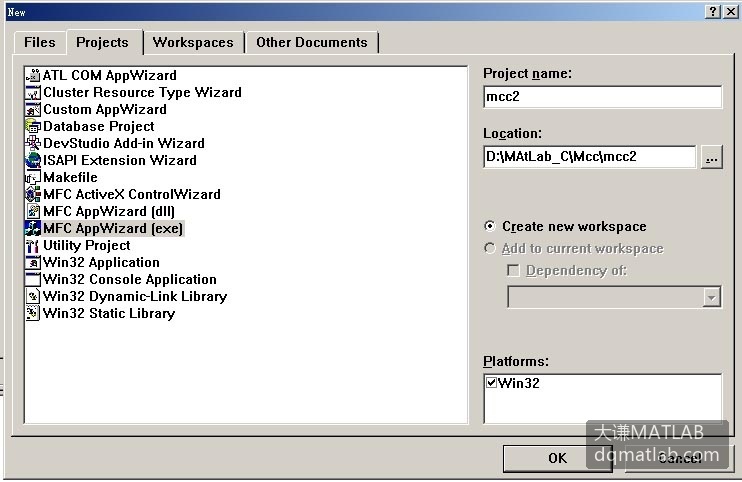
图2-1 mcc2工程创建
4.VisualC++环境配置
设定头文件和库文件路径
菜单Tools->Options->Directories
Include files:添加%MATLAB7%extern\include
Library files:添加%MATLAB7%extern\include
设置编译连接选项
菜单Project->Settings
Link->Object/Library modules: 添加mclmcrrt.lib libtest.lib
General->Microsoft Foundation Classes: Use MFC in a Static Library
5.编写mcc2工程对话框
创建如图2-2所示mcc2工程对话框。对话框控件属性如表1-2所示。利用ClassWizard分别为IDC_EDIT_Xydim编辑框、IDC_LIST_Out和IDC_LIST_Out2列表控件添加变量“m_XYdim”、“m_Mcc2_List”和“m_Mcc1_List”,为IDC_BUTTON_Mcc1按钮添加响应函数“OnBUTTONMcc1()”。
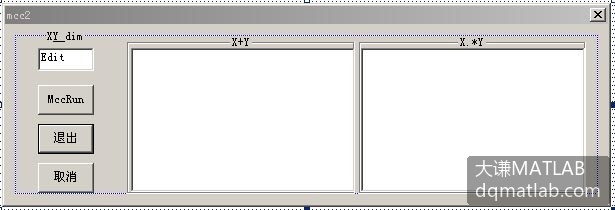
图2-2 创建mcc2工程对话
表2-1 mcc2对话框控件属性
| 控件属性 | 控制ID | 说 明 |
|---|---|---|
| Edit Box | IDC_EDIT_XYdim | 接受用户输入X和Y向量的维数 |
| Button | IDC_BUTTON_Mcc1 | 鼠标左键单击该控件,调用libtest中对应于test.m函数 |
| Button | IDOK | 结束对话框 |
| Button | IDCANCEL | 取消对话框进程 |
| List Box | IDC_LIST_Out | 用于显示X+Y计算结果 |
| List Box | IDC_LIST_Out2 | 用于显示X.*Y计算结果 |
6.添加mcc编译文件
将mcc编译“test.m”生成的“libtest.h”、“libtest.lib”、“libtest.dll”和“libtest.ctf”4个文件拷贝至mcc2工程目录中。并用project->add to project->Files将“libtest.h”加入mcc2工程中。在对话框程序文件“mcc2Dlg.h”中添加头文件“libtest.h”和“mclmcr.h”。
打开“libtest.h”,从程序清单中可知,libtest.h文件中主要声明程序运行时所需的初始化函数libtestInitialize()、程序终止时libtestTerminate()函数,以及对应test.m文件中mlfTest()函数。其中mlfTest()参数为:输出参数个nargout;输出参数列表:mxArray** a, mxArray** b,分别对应test.m文件中的左手侧参数;输入参数列表:mxArray* x, mxArray* y,分别对应test.m文件中的右手侧参数。因此,用mcc编译器将m文件转化为C程序,其数据类型是mxArray类对象。
/////////////////////////////////// libtest.h文件清单
#ifndef __libtest_h
#define __libtest_h 1
#if defined(__cplusplus) && !defined(mclmcr_h) && defined(__linux__)
#  pragma implementation "mclmcr.h"
#endif
#include "mclmcr.h"
#ifdef __cplusplus
extern "C" {
#endif
extern bool libtestInitializeWithHandlers(mclOutputHandlerFcn error_handler,
                                          mclOutputHandlerFcn print_handler);
extern bool libtestInitialize(void);    ////////////////初始化函数
extern void libtestTerminate(void);  /////////////////终止函数
extern void mlxTest(int nlhs, mxArray *plhs[], int nrhs, mxArray *prhs[]);///默认函数
extern void mlfTest(int nargout, mxArray** a, mxArray** b
                    , mxArray* x, mxArray* y);///////////对应于test.m中函数
#ifdef __cplusplus
}
#endif
#endif
7.初始化进程
在BOOL CMcc2Dlg::OnInitDialog()函数中添加以下代码,以便在进行对话框初始化后,进行初始化libtest.dll进程,代码置于对话框初始化与进程返回之间。
if( !mclInitializeApplication(NULL,0) )
{AfxMessageBox( "Could not initialize the application."); exit(1); }
   if(!libtestInitialize())
   {AfxMessageBox("Could not initialize the library."); exit(1); }
8.调用mlfTest()函数
在void CMcc2Dlg::OnBUTTONMcc1()函数中添加以下代码,实现对test.m调用。
void CMcc2Dlg::OnBUTTONMcc1()
{
CString str1,str2;
mxArray *in1, *in2; ////////输入参数,分别对应test.m中右手侧参数x,y
mxArray *out1 = NULL; ////////输出参数,分别对应test.m中右手侧参数a,b
mxArray *out2 = NULL;
double *data;
int i,n;
UpdateData(TRUE); n=m_XYdim;///将编辑框数据传送机制设为从编辑框到变量
data=new double[n];
for(i=0;i<n;i++)data[i]=(double)i;
in1 = mxCreateDoubleMATrix(1,n,mxREAL); /////////mxArray对象分配地址
in2 = mxCreateDoubleMATrix(1,n,mxREAL);
memcpy(mxGetPr(in1), data, n*sizeof(double)); ///将C数据类型转换为mxArray数据
memcpy(mxGetPr(in2), data, n*sizeof(double));
mlfTest(2,&out1,&out2,in1,in2);///////////////调用libtest.h中函数,对应于test.m
for(i=0;i<=n;i++){
str1.Format("%8.2f + %8.2f = %8.2f  ",
		   *(mxGetPr(in1)+i),*(mxGetPr(in2)+i),*(mxGetPr(out1)+i));
str2.Format("%8.2f .* %8.2f = %8.2f  ",
		   *(mxGetPr(in1)+i),*(mxGetPr(in2)+i),*(mxGetPr(out2)+i));
m_Mcc1_List.AddString(str1); ///用列表控件将计算结果显示出来
m_Mcc2_List.AddString(str2);
}
mxDestroyArray(out1); mxDestroyArray(in1); ///内存释放
mxDestroyArray(out2); mxDestroyArray(in2);
delete data;
}
9.进程终止与资源释放
利用ClassWizard为对话框添加void CMcc2Dlg::OnDestroy()函数,并添加以下代码。
void CMcc2Dlg::OnDestroy()
{
CDialog::OnDestroy(); //////结束对话框并释放资源
libtestTerminate();
mclTerminateApplication();
}
10.编译运行
在本机上编译运行后结果如图2-3和图2-4所示。
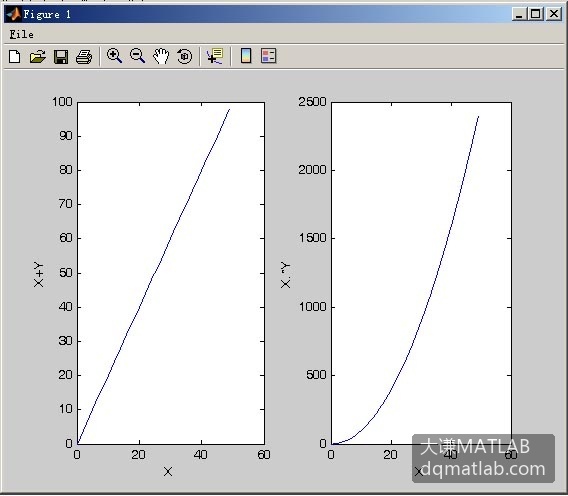
图2-3 Mcc2运行结果1
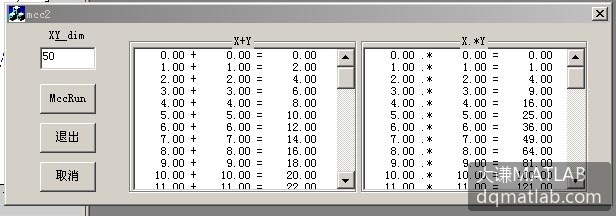
图2-4 Mcc2运行结果2
11.独立应用程序发布
首先,将MATLAB6p5\extern\lib\win32\MCRInstaller.exe拷贝到目标计算机,并在目标机器上运行,解压时注意要保持解压后的路径与第一台计算机上MATLAB的安装路径一致,安装好MCR之后,将<mcr_root>\runtime\win32加入到系统的环境变量path中去;
其次,将工程文件的可执行程序(exe),共享库(DLL),共享库对应的.ctf文件拷贝到目标计算机。